


In this article I will explain how to use cloud solutions to provide endpoints for autocomplete feature in serverless applications. First of all you will have to create free accounts on Microsoft Azure and Amazon Web Services. When you finish, we can move on to Search Service usage and configuration.
Index
Azure Search Service
Basic information
Limits & pricing
Azure Search Service vs. SQL search
How to configure Azure Search Service
Create Search Service
Create index
Upload documents via REST API
Other document operations
Language analyzers
How to use Azure Search Service
Basic parameters
Regular expressions
Fuzzy search
Field-scoped search
Example
AWS API Gateway integration
Why not to use Azure URL directly
Pricing
Create REST API
Set HTTP integration
Deploy
Usage
Add input validation
Azure Search Service
Search Service is a really useful cloud solution to search database according to specified criteria. It provides many features which are often required in real-life cases, but not supported out of the box by SQL engines. With Azure you can find matches even for words which occur in text in a different form.
Basic information
Limits & pricing
Limits in free subscription are quite satisfying if we talk about small project. It’s also worth to mention that after 12 months, when your free plan expires, you will still be able to use Search Service for free.
If your database has less than 50 MB, this is a perfect option for you. However, if you need more, you’ll have to pay around $100/month (pricing details), so unless you are working on an enterprise project it may be worth to consider your own implementation.
AWS also has CloudSearch service, but it doesn’t have any free plan, you’d have to spend at least $60/month.
Limits (free tier):
- 50 MB storage
- 10,000 documents (unlimited for some services created since late 2017, up to storage limit)
- 3 indexes + 3 indexers + 3 data sources
- 1 minute running time of indexer per single run
- 1000 fields per index
- more information
Azure Search Service vs. SQL search
So why use Search Service rather than SELECT on (No)SQL database?
Main advantages (all features below are optional):
- Fuzzy search – finds results even for misspelled phrases
- Proximity search – you can specify how far two words can be from each other in text
- Regular expression search – great feature which is not supported in some SQL databases
- Field-scoped search – you can define which fields you want to search
- Any word search – finds results for partial matches
- Intelligent language analyzer – recognizes different forms of the word
- Ignoring diacritics – finds results when you use English alphabet instead of diacritics
- Ignoring words order
- Each result has a score which indicates how important it is according to your criteria
- Geo-search – finds results within defined distance
- Hit highlighting – highlights matching keywords
- more features
It would take a lot of time to support all these features using just a database and simple SQL syntax. Most likely you would end up with less efficient code anyway. Therefore Search Service is an elegant solution if you need to provide search functionality in your application.
How to configure Azure Search Service
Create Search Service
Let’s start with creating Search Service on Azure Portal.
- Go to Azure Portal
- Type in search bar “Azure Search”
- Select “Azure Search” from “Marketplace” section
- Fill the form according to your project
- Make sure to select Pricing tier = Free
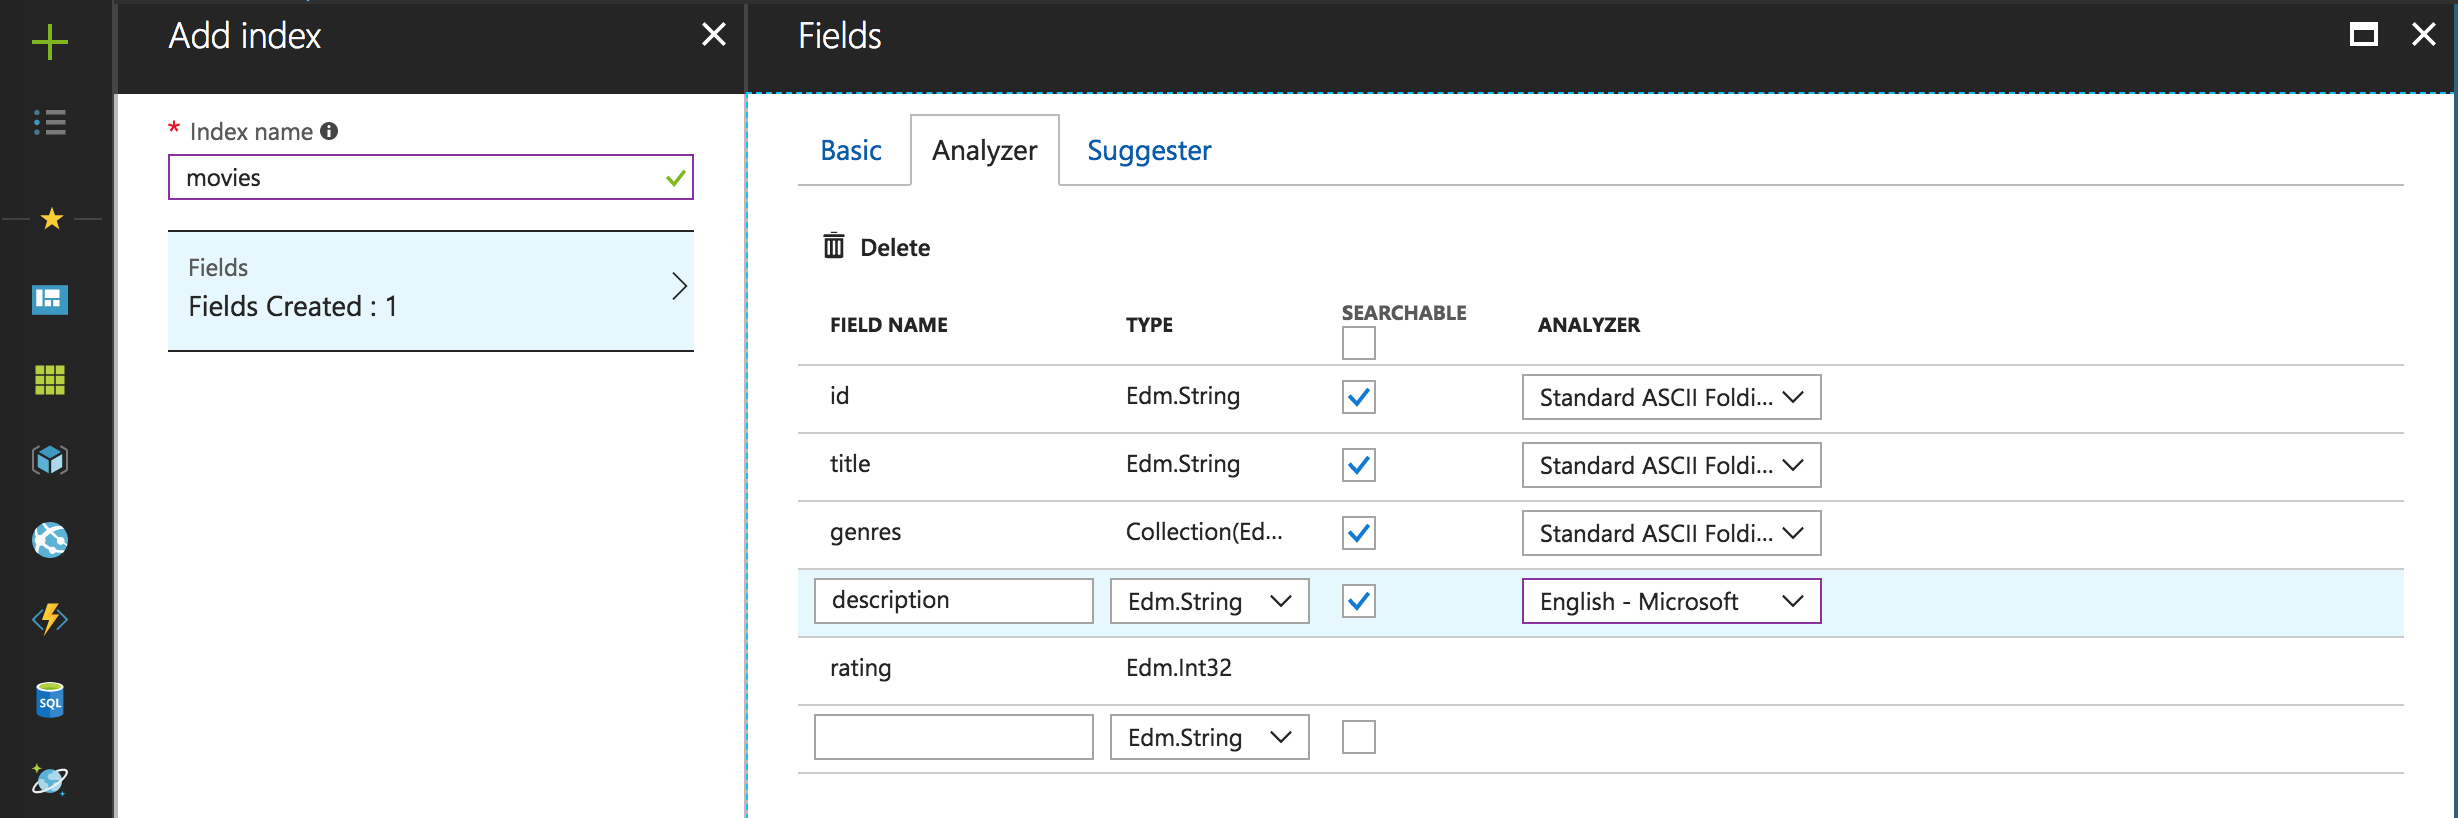
Create index
Index is a collection of documents with defined fields, data types and behaviors, which allows to perform search operations. Now when you’ve got working service, you can create your first index.
- Navigate to your Search Service
- Click on “Add index”
- Set index name
- Create structure of your searchable database
- Set which fields should be retrievable, filterable, sortable, facetable or searchable

- Go to “Analyzer” section and select preferred analyzers (read more)

- Click on “OK” in “Fields” window
- Click on “OK” in “Add index” window

Upload documents via REST API
To fill index with data we need to upload documents using REST API (it’s also possible to import data through Azure Portal using data source like CosmosDB):
POST https://[service name].search.windows.net/indexes/[index name]/docs/index?api-version=2016-09-01
Content-Type: application/json
api-key: [admin key from Search Service -> Keys]
Sample request body:
{
  "value": [
    {
      "@search.action": "upload",
      "id": "1",
      "title": "Pirates of the Caribbean: The Curse of the Black Pearl",
      "genres": ["1", "3", "5"],
      "description": "Blacksmith Will Turner teams up with eccentric pirate 'Captain' Jack Sparrow to save his love, the governor's daughter, from Jack's former pirate allies, who are now undead.",
      "rating": 8
    },
    {
      "@search.action": "upload",
      "id": "2",
      "title": "The Lord of the Rings: The Fellowship of the Ring",
      "genres": ["1", "3", "5"],
      "description": "A meek Hobbit from the Shire and eight companions set out on a journey to destroy the powerful One Ring and save Middle-earth from the Dark Lord Sauron.",
      "rating": 9
    }
  ]
}
Sample response:
{
    "@odata.context": "https://service-name.net/indexes('movies')/$metadata#Collection(Microsoft.Azure.Search.V2016_09_01.IndexResult)",
    "value": [
        {
            "key": "1",
            "status": true,
            "errorMessage": null,
            "statusCode": 200
        },
        {
            "key": "2",
            "status": true,
            "errorMessage": null,
            "statusCode": 200
        }
    ]
}
I recommend to use Postman to perform API requests. If your request is valid, you should receive 200 status code.
Other document operations
You can also use other @search.action like: merge, mergeOrUpload or delete. Merge action will replace only specified fields in existing document. For delete action you only have to fill key field.
Language analyzers
Azure provides several types of language analyzers which you can choose to improve search quality according to your needs. Here you can find a really nice demo of all analyzers for English language.
- Standard Lucene – default analyzer, which works well with basic forms of English words
(won’t find alice’s for phrase alice) - Standard ASCII folding – Lucene – transforms diacritics to ASCII equivalents
(will find cześć for phrase czesc or cześć) - [Language] – Lucene – extends standard Lucene with basic language analysis
(will find alice’s for phrase alice) - [Language] – Microsoft – provides an advanced text analysis, which is able to find irregular word forms
(will find thought for phrase thinking) - Custom analyzer – using REST API you can build your own analyzer adjusted to your needs
How to use Azure Search Service
In this article I will focus on Search functionality, however you may consider using Suggestions, which are recommended by Microsoft for autocomplete and they claim it has lower latency. You can use it almost in the same way as Search, but it’s a little bit more limited, it doesn’t support logical operators and RegExp in queries.
Search Service requires only a single call to REST API endpoint to retrieve results:
POST https://[service name].search.windows.net/indexes/[index name]/docs/search?api-key=YOUR_KEY&api-version=2016-09-01
Content-Type: application/json

YOUR_KEY - query key from Search Service -> Keys
Basic parameters
Search configuration:
- search=[query] – main parameter to define our search query
- searchFields=[comma-separated fields] – list of fields to search for the specified phrase
- searchMode=all – includes only results containing all terms from the search phrase
- queryType=full – enables Lucene query syntax, which allows to use advanced search query,
simple allows to use only Simple query syntax symbols like (), |, *, -, + and “”
Results configuration:
- top=[number] – defines number of records to display (maximum page size is 1000)
- skip=[number] – defines number of records to skip (must be lower than 100,000)
- select=[comma-separated fields] – defines list of fields to include in results
- orderBy=[comma-separated expressions] – defines list of expressions to order results
- filter=[expression] – defines OData Expression to filter results
- highlight=[comma-separated fields] – defines list of fields to highlight hits
- facets=[comma-separated fields] – defines list of fields to group results
- count=true – enables counting of results
Regular expressions
Set queryType=full for RegExp support. To use it just put expression between / symbols, for example /expression/.
{
    "search": "title:/pirate.*//cari[b]+ean/",
    "queryType": "full",
    "searchMode": "all"
}
Regular expressions in Search Service may be very tricky at the beginning. Few things to memorize:
- It works only for terms, so if you try to search phrase with spaces or interpunction, it won’t work.
- If you want to search multiple terms, you can join expressions: /expression1//expression2/.
In this case searchMode parameter is important – searchMode=all will return results only when both expressions are fulfilled. - Language analysis is limited for RegExp, you should test it and make sure that it works as expected for you.
- You can use logical operators between expressions: (/expression1/ OR /expression2/) AND /expression3/.
Fuzzy search
You can also use ~ in query to define how many characters may differ from the specified phrase. The number must be between 0 and 2.
{
    "search": "book~1"
    "queryType": "full"
}
This query will match “book”, “cook”, “look” etc.
Field-scoped search
Lucene query syntax allows to specify query for each field. You can also combine them with logical operators.
{
    "search": "(city:chicago OR bigCityNearby:chicago) AND state:il AND country:\"United States\""
    "queryType": "full"
}
Example
{
    "queryType": "full",
    "searchMode": "all",
    "searchFields": "title,description",
    "highlight": "title",
    "search": "th~ of",
    "filter": "rating gt 5",
    "facets": ["rating"],
    "orderby": "title desc",
    "top": 2,
    "count": "true"
}
Response:
{
    "@odata.context": "https://service-name.search.windows.net/indexes('movies')/$metadata#docs",
    "@odata.count": 2,
    "@search.facets": {
        "rating@odata.type": "#Collection(Microsoft.Azure.Search.V2016_09_01.QueryResultFacet)",
        "rating": [
            {
                "count": 1,
                "value": 8
            },
            {
                "count": 1,
                "value": 9
            }
        ]
    },
    "value": [
        {
            "@search.score": 0.40118808,
            "@search.highlights": {
                "title@odata.type": "#Collection(String)",
                "title": [
                    "<em>The</em> Lord <em>of</em> <em>the</em> Rings: <em>The</em> Fellowship <em>of</em> <em>the</em> Ring"
                ]
            },
            "id": "2",
            "title": "The Lord of the Rings: The Fellowship of the Ring",
            "genres": ["1", "3", "5"],
            "description": "A meek Hobbit from the Shire and eight companions set out on a journey to destroy the powerful One Ring and save Middle-earth from the Dark Lord Sauron.",
            "rating": 9
        },
        {
            "@search.score": 0.3789245,
            "@search.highlights": {
                "title@odata.type": "#Collection(String)",
                "title": [
                    "Pirates <em>of</em> <em>the</em> Caribbean: <em>The</em> Curse <em>of</em> <em>the</em> Black Pearl"
                ]
            },
            "id": "1",
            "title": "Pirates of the Caribbean: The Curse of the Black Pearl",
            "genres": ["1", "3", "5"],
            "description": "Blacksmith Will Turner teams up with eccentric pirate 'Captain' Jack Sparrow to save his love, the governor's daughter, from Jack's former pirate allies, who are now undead.",
            "rating": 8
        }
    ]
}
AWS API Gateway integration
Why not to use Azure URL directly – security considerations
Imagine you use directly Azure URL to retrieve search results in mobile application. If someone tracks network traffic, he will get your index URL and API key. Knowing URL he could set top=100000 without search and select parameters. A simple script to iterate through results could copy your whole database within a few seconds.
Another example of possible attack is to pass through search query all single letters from alphabet. Due to lack of the minimum number of characters required, it will most likely dump whole database. Although even if you set validation to at least 3 characters, still someone could use dictionary attack and pass related words. In this case throttling feature from API Gateway may be useful.
AWS API Gateway is a great solution to protect your Search Service index. It allows to hide, limit and validate parameters which will be sent to Azure. You can even attach AWS Lambda to provide encryption and/or authorization to make results unusable for other applications.
Pricing
Please read my previous post to learn more about pricing, creating API and using AWS Lambda:
Deploy a free backend with REST API using Amazon Web Services (AWS).
Create REST API
- Go to Amazon API Gateway
- Click on “Create API”
- Set API Name = “movies” and click on “Create API”
- Now let’s define the following endpoint /autocomplete.
In order to do that click on “Actions” -> “Create Resource” - Name it “Autocomplete” and click on “Create Resource”
- Now let’s define GET method for this resource.
Click on “Actions” -> “Create Method”, select “GET” and confirm. - Repeat steps to create endpoint: /details/{id}

Set HTTP integration
Now we can prepare request mapping to our Azure Search Service endpoint.
- Click on “GET” method
- Select Integration type = HTTP
- Select HTTP Method = POST
- Set endpoint URL:
https://[service_name].search.windows.net/indexes/[index_name]/docs/search?api-key=YOUR_KEY&api-version=2016-09-01 - Click on “Save”
Now we have to add body template, which will be sent to Azure:
- Click on “Integration Request”
- Click on “Body Mapping Templates”
- Select “Never”
- Click on “Add mapping template”
- Enter “application/json” and apply
- Scroll down and fill template:
For autocomplete endpoint:
{
    "queryType": "full",
    "select": "id,title",
    "searchMode": "all",
    "search": "$util.escapeJavaScript($util.urlDecode($input.params('search'))).replaceAll("\\'","'")*",
    "orderby": "title asc",
    "searchFields": "title",
    "top": 4
}
For details/{id} endpoint:
{
    "queryType": "full",
    "filter": "id eq '$input.params('id')'",
    "top": 1
}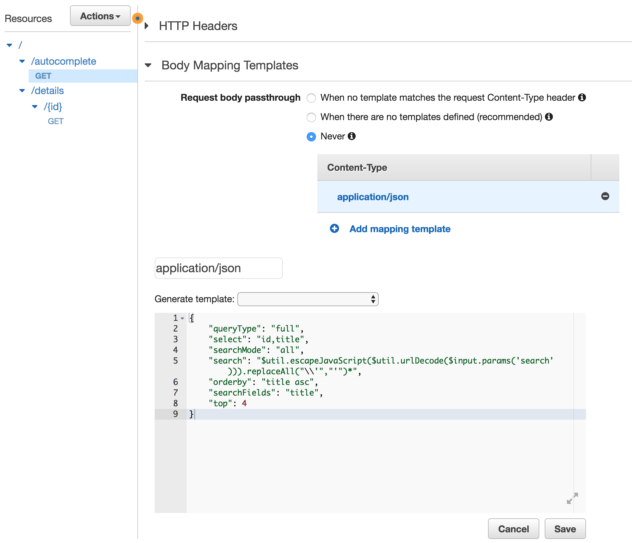

Note that autocomplete endpoint won’t find documents when you pass phrase “pir of the caribbean”. It’s because wildcard(*) is at the end, not after each term. To change this behavior you can set searchMode=any or you can add wildcard after each term by replacing spaces: .replaceAll(” “,”* “).
Deploy
- Click on “Actions” -> “Deploy API”
- Select “[New Stage]”, name it “movies”
- Click on “Deploy”
- At the top you will see your public API url:
https://{id}.execute-api.{region}.amazonaws.com/movies
Usage
Your new REST API is published now and you can use it to implement autocomplete functionality. By calling:
https://{id}.execute-api.{region}.amazonaws.com/movies/autocomplete?search={phrase}
you can provide results for autocomplete list and when user selects item, you can retrieve details from:
https://{id}.execute-api.{region}.amazonaws.com/movies/details/{id}
Add input validation
In order to add validation, please refer to this article:
How to remove boilerplate validation logic in your REST APIs with Amazon API Gateway request validation.
Another way is to use AWS Lambda and implement your own validation. You can read more about Lambda in my previous post:
Deploy a free backend with REST API using Amazon Web Services (AWS).