
Nowadays most applications require internet access. Usually we need a backend to provide content, store data or to share information between multiple users. However, if you work on a small personal project, most likely you won’t be interested in spending money on servers, especially when you don’t even know if your idea will make any money.
Fortunately there are Amazon Web Services which provide a wide range of services in Free Tier. This is a perfect solution for mobile applications.
Index
AWS
Pricing
Architecture
Prepare environment
Deploy backend using AWS Lambda
Create AWS Lambda project
Prepare models
Implement logic
Create IAM user
Create IAM role
Deploy
Test
Deploy REST API using AWS API Gateway
Define resources & methods
Attach AWS Lambda Function
Add body mapping template
Deploy
Test query parameters
Test path parameters
AWS
It’s free, however with some limits. Great thing about this approach is that you pay for what you use, so if your project will become famous, you can easily cover extra costs without any up-front payments.
Another huge advantage of AWS is that it scales up easily, you won’t encounter most issues which are very likely when you have only one server and traffic dramatically increases. Using AWS you can easily add load balancing, enable cache, throttling and provide multiple endpoints located around the world.
Pricing
Limits in Free Tier:
- AWS Lambda – 1 million free requests per month
- AWS API Gateway – 1 million free API calls per month
- AWS DynamoDB – free 25GB of storage and up to 200 million requests per month
Limits after the first 12 months (when Free Tier expires)
From 3 services which I mentioned above only AWS API Gateway will become extra paid. To ensure the same limits as in Free Tier, you will have to pay around $4 per month. Exactly it’s $3.50 per million API calls received, plus the cost of data transfer out ($0.09/GB for the first 10 TB).
You may say now ‘wait… so I will have to pay anyway!’, but think about it from another perspective. If during the first year your project won’t make money, then you may decide to close it or move it to some low-performance solution like a small private server. On the other hand, if you do make some money, then probably 2 or 4 dollars per month shouldn’t be a big deal.
Architecture
Idea is quite simple, I will create a REST API using AWS API Gateway and each endpoint will call AWS Lambda function to perform backend operations. In this example I will create an endpoint for movies autocomplete feature.
Sample API call:
https://domain.com/movies/autocomplete?genres=1,3&phrase=lord
Sample backend input:
{
    "phrase": "lord",
    "genres": [1, 3]
}
Sample output:
[
   {
      "Id": 1243,
      "Title": "The Lord of the Rings",
      "Genres": [2, 3]
   }
]
Prepare environment
- Create a Free Tier account on AWS.
- Install Visual Studio 2017 with .NET Core.
- Download and install AWS Toolkit for Visual Studio, which will add an extensions to create and deploy AWS Lambda easily.
Deploy backend using AWS Lambda
AWS Lambda provides a cloud server where you can deploy your own logic to process requests from API Gateway. It’s very handy, because you can implement there a simple backend. You can even integrate it with database like AWS DynamoDB. In this example I will show how to create a function to return list of movies.
AWS Lambda supports C# (.NET Core), Go 1.x, Java 8, Node.js and Python, so you can choose any language you like, I will use C#.
Create AWS Lambda project
Open Visual Studio 2017, click on “Create new project…”, select template called “AWS Lambda Project (.NET Core)” and name it “MoviesLambda”.

Prepare models
AWS Lambda by default uses JsonSerializer, therfore we can just create a class with public properties and JSON will be automatically converted into this object. Our models could look like this:
|
1 2 3 4 5 6 |
public class Movie { public int Id { get; set; } public string Title { get; set; } public int[] Genres { get; set; } } |
|
1 2 3 4 5 |
public class AutocompleteQuery { public string Phrase { get; set; } public int[] Genres { get; set; } } |
Implement logic
Now when we have input data, we can prepare results. A sample implementation to filter results:
|
1 2 3 4 5 6 7 8 9 10 11 12 13 14 15 16 17 18 19 20 21 22 23 24 25 26 27 28 29 30 31 32 33 34 35 36 37 38 39 |
using Amazon.Lambda.Core; using System.Collections.Generic; using System.Linq; // Assembly attribute to enable the Lambda function's JSON input to be converted into a .NET class. [assembly: LambdaSerializer(typeof(Amazon.Lambda.Serialization.Json.JsonSerializer))] namespace MoviesLambda { public class Function { private readonly Movie[] moviesDatabase = new[] { new Movie { Title = "Moon", Genres = new[] { 6 } }, new Movie { Title = "Pulp Fiction", Genres = new[] { 1, 3, 5 } }, new Movie { Title = "Pirates of the Caribbean", Genres = new[] { 1 } }, new Movie { Title = "The Lord of the Rings", Genres = new[] { 2, 3 } } }; public List<Movie> MoviesAutocomplete(AutocompleteQuery input, ILambdaContext context) { if (string.IsNullOrWhiteSpace(input.Phrase)) { return new List<Movie>(); } var title = input.Phrase.ToLower().Trim(); var foundMovies = this.moviesDatabase.Where(x => x.Title.ToLower().Contains(title)); if (input.Genres?.Any() ?? false) { foundMovies = foundMovies.Where(movie => input.Genres.Any(genre => movie.Genres.Contains(genre))); } return foundMovies.ToList(); } } } |
Create IAM user
When everything is ready, we can prepare to deploy our Lambda function. First we need to create an IAM user, which will be used to deploy Lambda from Visual Studio.
- Go to IAM -> Users
- Click on “Add user”
- Name it as you wish and check “Programmatic access”
- Click on “Next: Permissions”
- Click on “Attach existing policies directly” and select “AWSLambdaFullAccess”
- Click on “Next: Review”
- Click on “Create user”
- Click on “Download .csv” (important, later it won’t be possible)
Create IAM role
- Go to IAM -> Roles
- Click on “Create role”
- Click on “AWS Service” and select “Lambda”
- Click on “Next: Permissions”
- Select “AWSLambdaFullAccess”
- Click on “Next: Review”
- Name the role as you wish and click on “Create role”
Deploy
Now we are ready to publish our Lambda function.
- Go to Visual Studio, right click on the project and select “Publish to AWS Lambda…”

- Create a new account profile and load previously downloaded .csv file (creating IAM user)
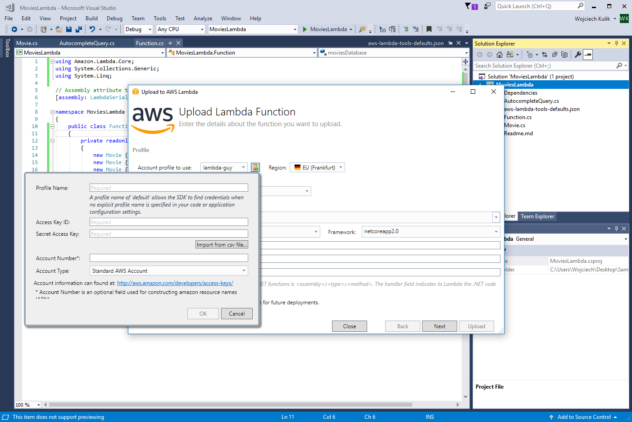
- Select region to upload Lambda
- Fill the form according to the screenshot:

- Click on “Next”
- Select previously created IAM role
- Click on “Upload”


Test
After upload is finished you should see a window where you can test your Lambda (you can also test it from AWS Lambda panel on the website), so let’s perform a sample request:

Deploy REST API using AWS API Gateway
AWS API Gateway provides a control panel to define REST API using visual designer. It offers many customizations like body mapping, request transformations, response transformations etc. In this section I will describe a simple usage to demonstrate how to configure it. For more details please refer to the documentation.
Define resources & methods
- Go to Amazon API Gateway
- Click on “Create API”
- Set API Name = “Movies” and click on “Create API”
- Now let’s define the following endpoint /autocomplete.
In order to do that click on “Actions” -> “Create Resource” - Name it “Autocomplete” and click on “Create Resource”
- Now let’s define GET method for this resource.
Click on “Actions” -> “Create Method”, select “GET” and confirm.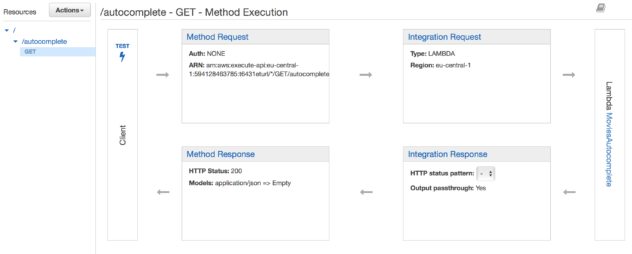

I assumed that we are going to call endpoint using query parameters: /autocomplete?genres=1,3&phrase=the. If you want to use path parameters to pass the phrase and genres you just need to create nested resources like this:
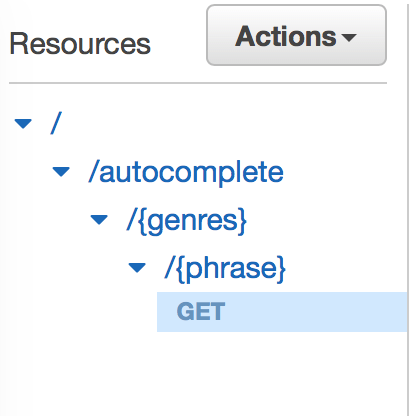
Use brackets in resource path to mark it as parameter. Next steps will remain the same no matter which approach you will choose.
Attach AWS Lambda Function
Next we need to attach our Lambda Function to be invoked by created endpoint. In order to do that click on “GET”, select your Lambda function and click on “Save”:

Add body mapping template
So far we’ve got defined API, however we still need to convert URL parameters to JSON object which will be passed to Lambda function. Fortunately it’s quite easy.
We can define our own body mapping and using $input.params(‘param_name’) we can extract parameters from URL. We will also use $util.urlDecode(‘param’) to decode for example ‘the%20lord’ to ‘the lord’ before passing it to Lambda.
To set Body Mapping Template:
- Click on “GET” -> “Integration Request” -> “Body Mapping Templates”
- Select “Never”
- Click on “Add mapping template” and set Content-Type = “application/json”
- Set the following template:
1234{"phrase": "$util.urlDecode($input.params('phrase'))","genres": [$util.urlDecode($input.params('genres'))]}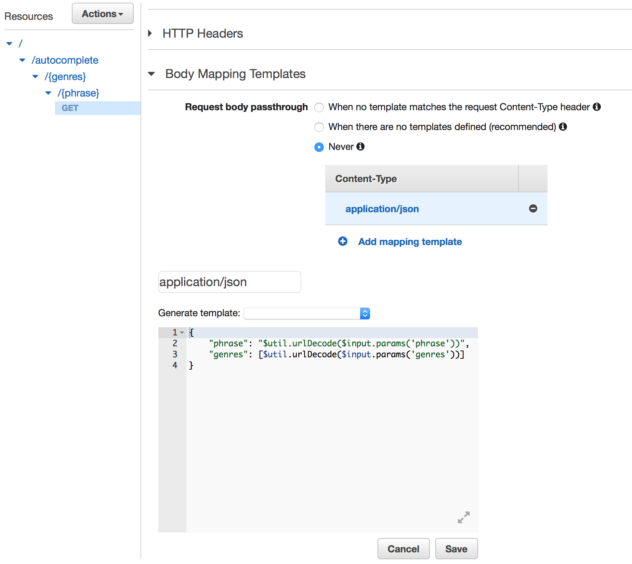

Deploy
Final steps to publish API:
- Click on “Actions” -> “Deploy API”
- Select “[New Stage]”, name it “movies”
- Click on “Deploy”
- At the top you will see your public API url:
https://{id}.execute-api.{region}.amazonaws.com/movies
Test query parameters (autocomplete?genres=1,3&phrase=the)
- Deploy your API
- Select your stage from Stages menu
- Go to “Logs”
- Enabled logging according to the screenshot:

- Deploy your API again (to enable CloudWatch logs)
- Go to CloudWatch
- Click on “Logs” and select your Log Group
- Now when you call your endpoint you will see here what’s going on:
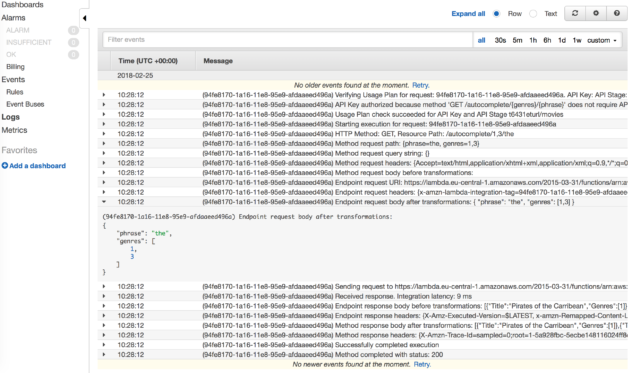
Logs


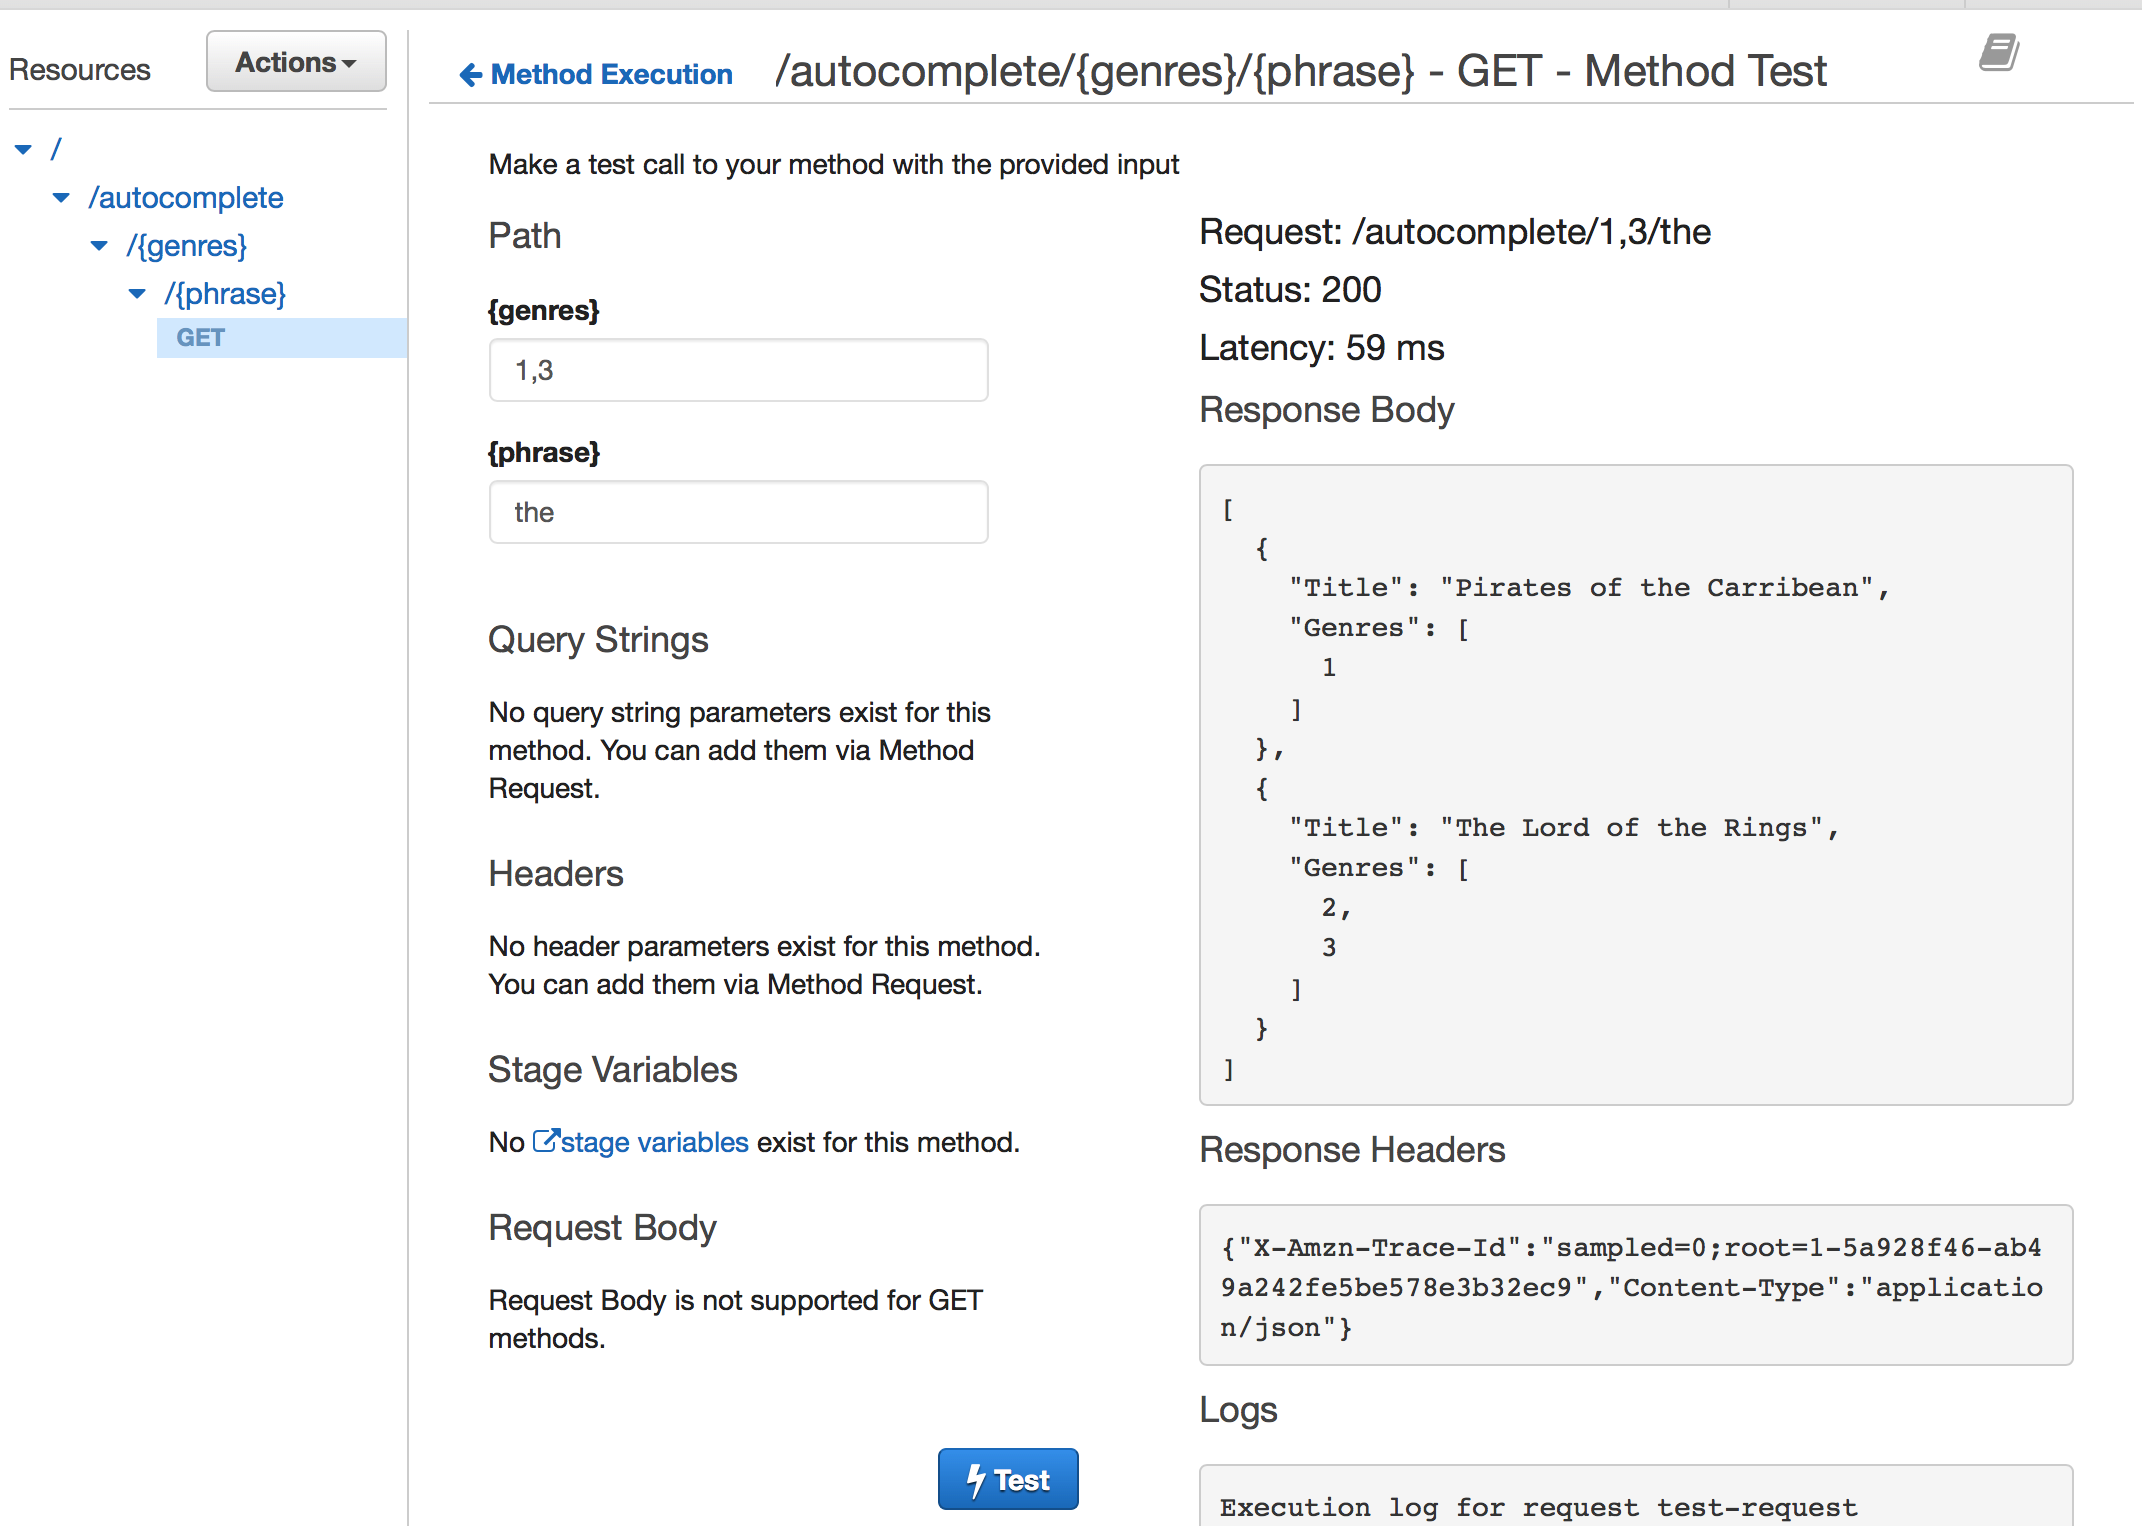
Test path parameters (autocomplete/1,3/the)
In this case it’s simple, you don’t even have to deploy your API.
- Click on “GET” method from your API structure.
- Click on “TEST” on diagram.
- Fill parameters and click on “Test”
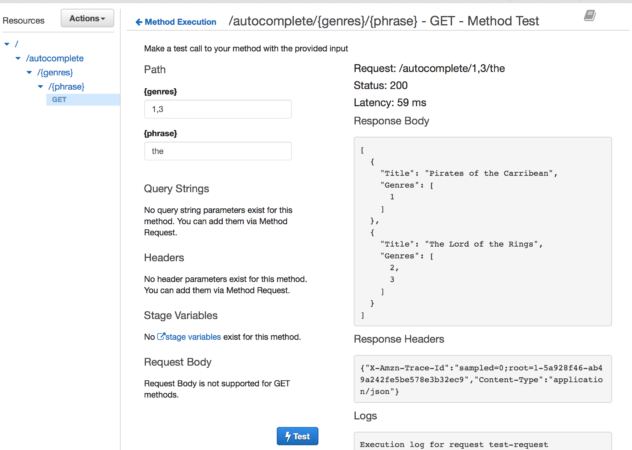
API test