Overview
In this post, I will show how to add simple localization support to iOS application and how to use it from Storyboard. In Apple’s documentation you can read an article Localizing Your App. However, the described ‘offical’ way to translate Storyboards generates some crazy entries. Even more, crazy things begin when you want to update translations.

So what’s the problem with this solution?
- Usually from a localization team or your client you will get translations as pairs: TranslationKey – Translation. It may be an XML file or something else, but anyway most likely no-one will be interested in delivering and maintaining a file like above (actually after exporting it you will get .xliff file which is even less readable, especially for people not related with IT).
- Redundancy! Many translations will occur multiple times and it makes them hard to change.
- When you add new controls to Storyboard, they don’t appear in .strings file automatically. This feature is not even available in Xcode, you have to do some ugly workarounds: Is it possible to update a localized storyboard’s strings?
- Try to move a ViewController from one Storyboard to another and your nightmare will begin. Now not only .strings files for two Storyboards are incorrect, but also .xliff file which you somehow managed to get after hours of convincing your localization team.
How to implement a better solution?
The idea is to create a single file per language with translations (Localizable.strings) which is supported by default by Xcode. Then we will prepare a set of basic controls to support translation keys from Storyboard.
Actually, if it’s better you have to decide on your own. There are of course some trade-offs, but it seems to be a reliable solution that shouldn’t cause a headache in case of changes in translations or Storyboards.
Add support for localization
1. Add Localizable.string
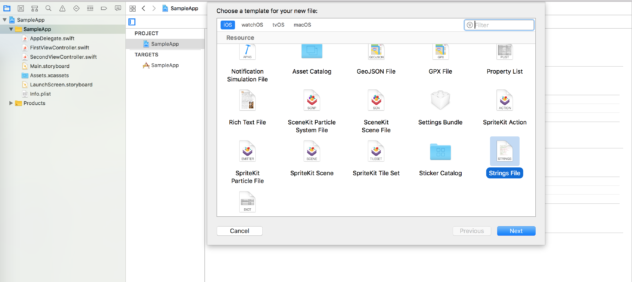
Click on File -> New -> File -> Select “Strings File” -> Name it “Localizable” and Save.

2. Enable localization for this file
Now you need to enable localization for Localizable.strings. I recommend to put this file in some folder like “Strings”, because later there will be generated folder for each language. To enable localization just select the file and click on “Localize…”.

3. Choose languages
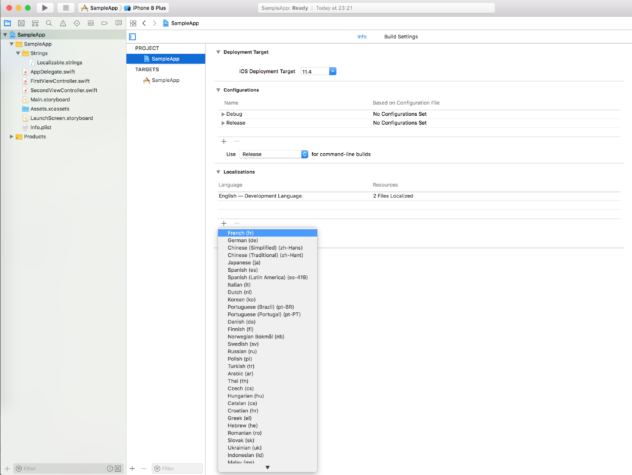
Select your project and add languages that you want to support.

When it asks to choose reference files, deselect all but “Localizable.strings”.

4. Add translations
Ok, so everything is ready. Now you can add your translations. If you have translations in XML from your localization team, then you will need to prepare a simple script to convert it to format: “TranslationKey” = “Translation”;

5. Use them from code
So for now we managed to add translations in multiple languages and we should be able to use them from code like this:
|
1 |
myLabel.text = NSLocalizedString("HelloWorld1", comment: "") |
6. Change language
To verify if your localization works, you will need to switch your phone to another language. Also, you can do that from Xcode, just go to Product -> Scheme -> Edit scheme and select Application Language:

Implementation
We already have working translations, but we need to use them from Storyboard to avoid adding outlets to all controls and setting translations in ViewController. Also it would be nice to have some extension to avoid writing every time something like NSLocalizedString(“HelloWorld1”, comment: “”).
1. String extension
By using this extension, you won’t be able to use genstrings command-line tool to create translation files from translation keys used in code. You have to decide if you need it. If you get translations from the localization team in a specific format, then probably you won’t need to use this tool.
|
1 2 3 4 5 6 7 8 9 10 11 |
import Foundation extension String { var localized: String { return NSLocalizedString(self, comment: "") } func localized(_ arguments: CVarArg...) -> String { return String(format: self.localized, arguments: arguments) } } |
Now you can use translations in code in more readable way:
|
1 2 3 |
myLabel.text = "HelloWorld1".localized // or myLabel.text = "SomeTranslationKey".localized("param1", 2) |
2. Set of controls to support translation key
|
1 2 3 4 5 6 7 8 9 10 11 12 13 14 15 16 |
import Foundation import UIKit class LocalizableLabel: UILabel { @IBInspectable var translationKey: String? override func awakeFromNib() { super.awakeFromNib() if let key = self.translationKey { self.text = key.localized } else { assertionFailure("Translation not set for \(self.text ?? "")") } } } |
|
1 2 3 4 5 6 7 8 9 10 11 12 13 14 15 16 |
import Foundation import UIKit class LocalizableButton: UIButton { @IBInspectable var translationKey: String? override func awakeFromNib() { super.awakeFromNib() if let key = self.translationKey { self.setTitle(key.localized, for: .normal) } else { assertionFailure("Translation not set for \(self.title(for: .normal) ?? "")") } } } |
This simple implementation will allow you to add translation keys from Storyboard for UILabel and UIButton. Of course you can add implementation for more controls if you need.
3. Usage from Storyboard
The only thing you need to do is to set Custom Class for your controls on Storyboard or if you have custom controls you have to change their base class in code. After that you will be able to set Translation Key on Storyboard. This implementation also detects very fast if translation key is not set and throws an exception.


Summary
Now you are able to use translation keys both from Storyboard and code. When you receive the updated file with translations, the only thing you need to do is to replace your current translations. This solution seems to be more flexible than the one described by Apple, especially since you can use one translation in multiple places and you don’t have to worry about updating Storyboards.


