


1. Overview
Core Data is an efficient framework for object graph management and persistence. It provides ready to use solutions which speed up implementation and solves well-known problems like tracking changes and migrations. It may become very handy if you need to store & process a lot of data.
People claim that learning curve is steep, but actually whole Model graph can be created using a simple visual editor and all CRUD operations are one/two-liners. I would say this reputation is caused mostly by lack of up-to-date tutorials. When I was learning this framework, it took me a while to find all basic information, because they are spread across many articles. That’s why I decided to gather here all you need to start.
It is also worth to mention main advantages of Core Data framework:
- 3 ways to persist data: SQLite, binary and in memory (+xml on macOS).
- Tracking changes in objects.
- Very efficient and highly optimized.
- Undo/redo mechanism.
NSFetchedResultsController(read more) which can be easily used to display data inUITableViewand automatically:- track changes in objects,
- group & display data in sections,
- cache fetched results.
- Support for background processing and conflict resolving (read more).
- Support for lightweight (automatic) and heavyweight (manual) migrations.
- Built-in editor for designing data model.
Unfortunately Core Data has no built-in encryption. If you want encrypted persistence, you need to create a custom store or implement custom transformation for selected attributes. There are also some 3rd party libraries. If you are looking for alternative solution read chapter “9. Core Data vs Realm”.
2. Create Data Model
To start working with Core Data we need to create a Data Model – a file containing definition of our entities. In order to do that, just press CMD+N and select Data Model template.

Now when we have our data model created, we can design entities using built-in editor.

To set up your first entity follow the steps below:
- Add a new entity and name it
User. - Add new attributes:
firstName,lastNameandusername. - Set type for each attribute.
- Optionally you can use graph editor.
Build your project and Xcode will automatically generate User class.
3. Create many-to-many relationship

Let’s first create another entity – Book. To define many-to-many relationship between User and Book follow the steps below:
- Add a new relationship for
User. - Set destination entity to
Book. - Set relationship type to
To Many. - Create a similar relationship for
Book.
Once both relationships are created, you will be able to set inverse entity to ensure a proper change tracking.
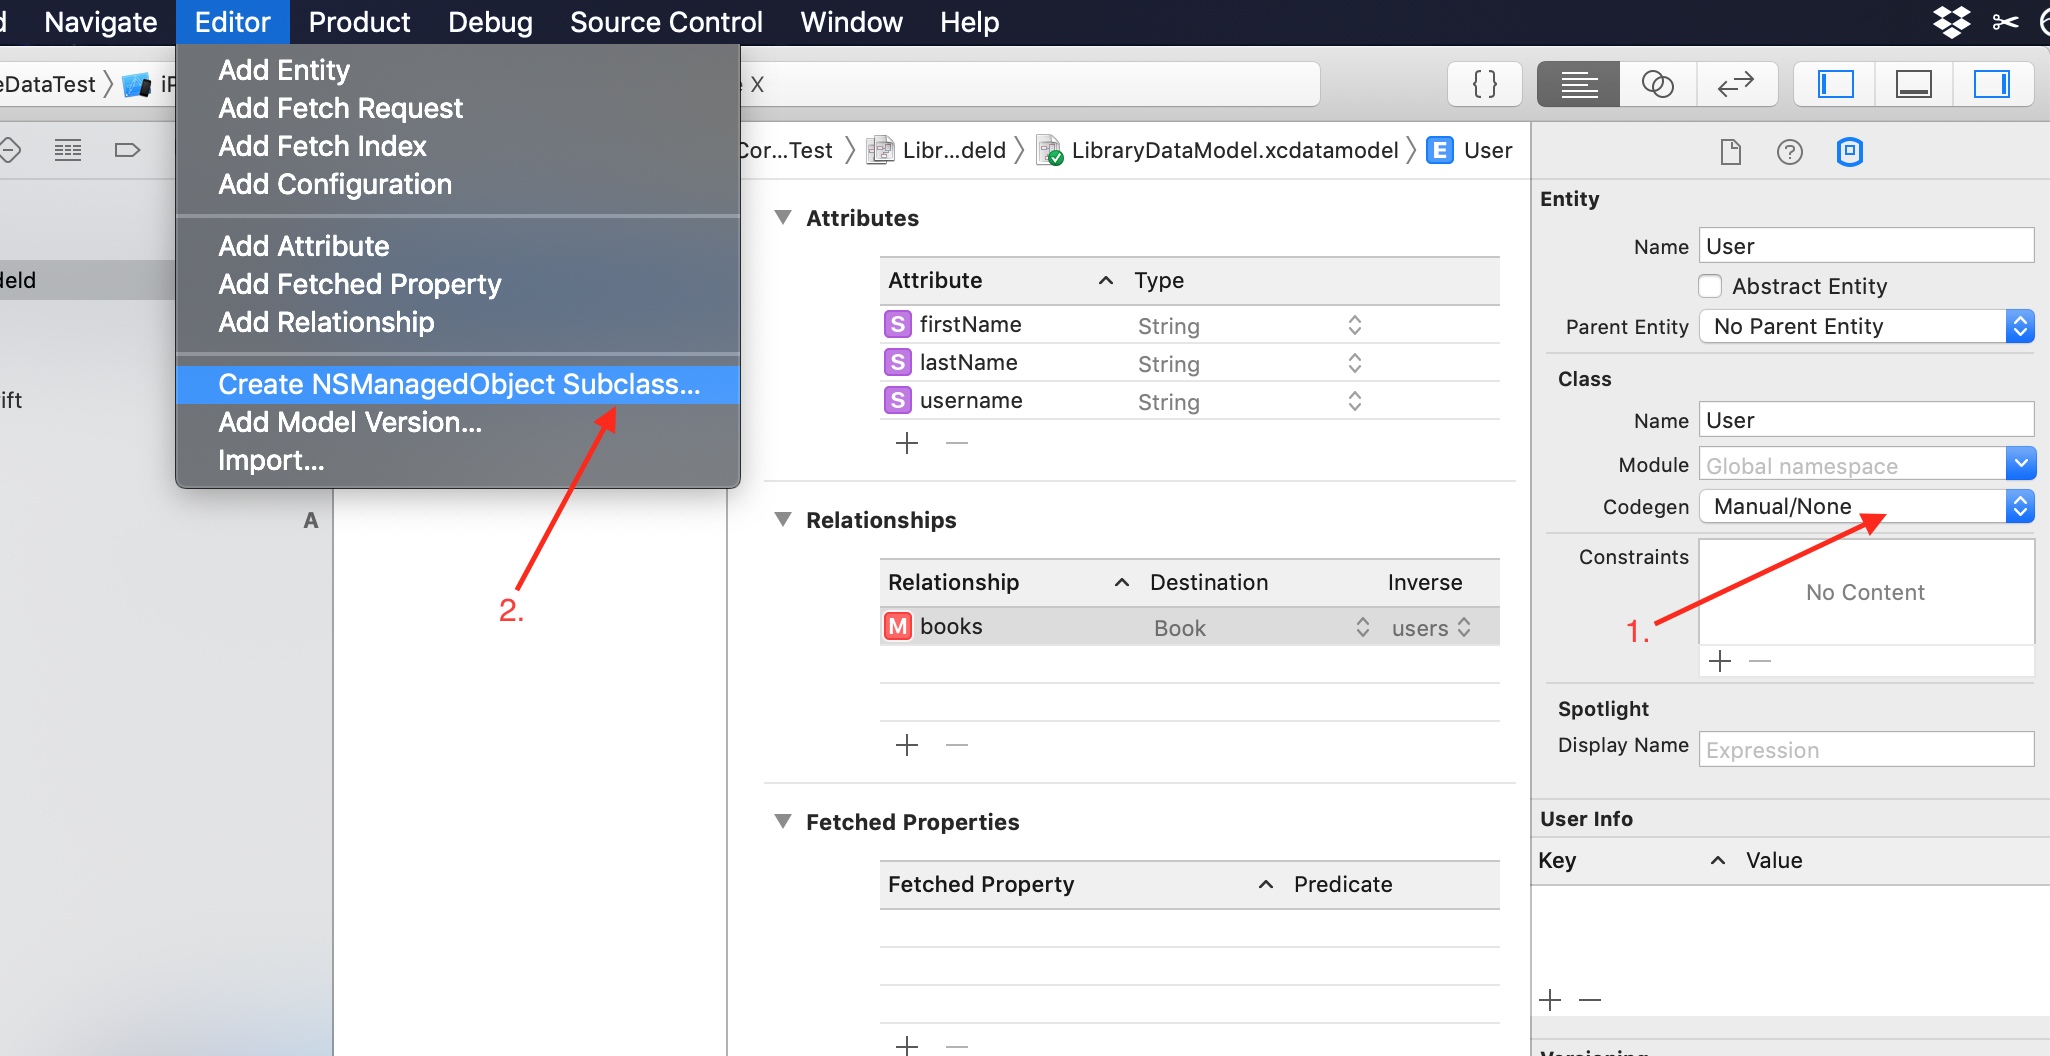
4. Strongly typed relationships
By default Xcode will generate relationship using properties of type NSSet. Casting each time retrieved objects doesn’t seem to be the best solution. Fortunately, it can be fixed by creating a custom model. In order to do that:
- Select
Userentity and set manual code generation. - Open
Editormenu and selectCreate NSManagedObject Subclass.... - In generated extension change
NSSettoSet<Book>. - Clean & build project.
|
1 2 3 4 5 6 7 8 9 10 11 |
extension User { @nonobjc public class func fetchRequest() -> NSFetchRequest { return NSFetchRequest(entityName: "User") } @NSManaged public var firstName: String @NSManaged public var lastName: String @NSManaged public var username: String @NSManaged public var books: Set<Book> // <--- 3. } |
5. Core Data Stack
Before requesting any data we need to first initialize Core Data Stack which includes:
NSManagedObjectModel– object describing schema of designed Data Model.NSManagedObjectContext– monitors changes in entities and store. Interface for CRUD operations.NSPersistentStoreCoordinator– saves and loads data from store. Associates persistent stores with a model.NSPersistentContainer– initializes and sets up context, model and coordinator.
Initialization
- Create an instance of
NSPersistentContainerfor designed Data Model. - Invoke initalization by calling
loadPersistentStoresmethod. - Check if operation is finished with success.
|
1 2 3 4 5 6 7 8 9 10 11 12 13 14 15 16 17 18 19 20 |
import Foundation import CoreData class DataController { // 1. let persistentContainer = NSPersistentContainer(name: "LibraryDataModel") func initalizeStack() { // 2. self.persistentContainer.loadPersistentStores { description, error in // 3. if let error = error { print("could not load store \(error.localizedDescription)") return } print("store loaded") } } } |
In memory persistence
If you prefer to use in memory store instead of default SQLite, you can do that by simply adding these lines at the beginning of initializeStack() method.
|
1 2 3 4 5 6 7 8 9 |
let description = NSPersistentStoreDescription() description.type = NSInMemoryStoreType // set desired type if description.type == NSSQLiteStoreType || description.type == NSBinaryStoreType { // for persistence on local storage we need to set url description.url = FileManager.default.urls(for: .documentDirectory, in: .userDomainMask) .first?.appendingPathComponent("database") } self.persistentContainer.persistentStoreDescriptions = [description] |
6. Create, Read, Update, Delete (CRUD)
Once the Core Data Stack is initialized we can start working with data. Each operation can be performed using NSManagedObjectContext which you can access from NSPersistentStoreContainer. First I will add context property to DataController to make the code less redundant.
|
1 2 3 |
var context: NSManagedObjectContext { return self.persistentContainer.viewContext } |
After each set of operations you should invoke self.context.save() to persist your changes. For now I put save in each method, but you don’t have to do this immediately. Especially if you want to have a larger transaction or implement undo feature.
Create (Insert)
|
1 2 3 4 5 6 7 8 9 10 11 12 13 14 15 |
func insertUser(withBook: Bool) throws { let user = User(context: self.context) user.firstName = "John" user.lastName = "Snow" user.username = "john_snow12" if withBook { let book = Book(context: self.context) book.title = "A Song of Ice and Fire" user.addToBooks(book) } self.context.insert(user) try self.context.save() } |
Read (Fetch)
By default Xcode inside each entity will generate fetchRequest class function which can be used to retrieve all objects. However you can also create your own NSFetchRequest with custom NSPredicate.
|
1 2 3 4 |
func fetchUsers() throws -> [User] { let users = try self.context.fetch(User.fetchRequest() as NSFetchRequest<User>) return users } |
|
1 2 3 4 5 6 7 |
func fetchUsers(withName name: String) throws -> [User] { let request = NSFetchRequest<User>(entityName: "User") request.predicate = NSPredicate(format: "firstName == %@", name) let users = try self.context.fetch(request) return users } |
Update
This part is quite interesting, you can see here change tracking in action. To update entity you can just modify its property and NSManagedObjectContext will be able to persist it properly after calling context.save() without passing any reference to object.
|
1 2 3 4 |
func update(user: User) throws { user.firstName = "John (updated)" try self.context.save() } |
Delete
|
1 2 3 4 |
func delete(user: User) throws { self.context.delete(user) try self.context.save() } |
Batch update or delete
Sometimes we need to perform a lot of operations. To speed it up there is NSBatchDeleteRequest and NSBatchUpdateRequest.
|
1 2 3 4 5 6 7 8 |
func deleteUsers(withName name: String) throws { let fetchRequest = User.fetchRequest() as NSFetchRequest<NSFetchRequestResult> fetchRequest.predicate = NSPredicate(format: "firstName == %@", name) let deleteRequest = NSBatchDeleteRequest(fetchRequest: fetchRequest) try self.context.execute(deleteRequest) try self.context.save() } |
7. Transactions
Using SQL databases you have transactions. Using Core Data you can rely on NSManagedObjectContext and built-in UndoManager. There is a set of simple methods to manage current state:
save()– similar tocommit– persists all changes and resets undo stack.rollback()– discards all changes since lastsave().undo()– reverts last change.redo()– reverts last undo action.
8. Migrations
Lightweight migration (automatic)
This migration assumes a “happy” case. Usually when you add/remove attributes/entities nothing should break, therefore migration should happen automatically without issues. In this case you have to:
- Select your Data Model.
- Open
Editormenu. - Select
Add Model version... - Select in
Navigator(left panel) your new version. - Perform desired changes – add/remove attributes/entities.
Once the new version is ready, you can migrate your Data Model to the latest version:

- Select any version of Data Model.
- Select any Entity (just to get a focus).
- Select
File inspector. - Set desired Model version.
Now you need to migrate also your objects representing entities:
- if you have custom subclasses you need to manually add/remove properties or regenerate files.
- if you use built-in code generation go to
Product -> Clean Build Folderand build it again.
That’s it. You should be able now to work with new Data Model.
Heavyweight migration
This migration is required when you need to perform custom mapping which can’t be handled automatically by Core Data. For example you may want to change attribute type from String to Integer 16 or divide value by 2.0.
Heavyweight migration is tricky and it’s very easy to make a mistake, so pay attention to details in all steps. In this example I will show migration of attribute bonusPoints:String to bonusPoints:Int16.
- Perform all steps from Lightweight migration.
- Create a new class
CustomMigrationwhich inherits fromNSEntityMigrationPolicy. - Implement methods which will be used to map attributes, each should be marked with
@objcattribute. - Make sure that each method uses proper types. For example if you have in Data Model attribute of type
Integer 32, your method should accept parameter of typeNSNumber. - Press
CMD + Nand add newMapping Model.
|
1 2 3 4 5 6 7 8 9 |
import Foundation import CoreData class CustomMigration: NSEntityMigrationPolicy { @objc func toInt16(value: String) -> NSNumber { return NSNumber(value: Int16(value)!) } } |
Now when we have implemented migration, we can attach it to Mapping Model.

- Select created
Mapping Model. - Select Entity which requires custom mapping.
- In the right panel, set
Custom PolicytoCoreDataTest.CustomMigration, notice that it’s important to specify module here. - Set expression which will use our
CustomMigration.toInt16function:
1FUNCTION($entityPolicy, "toInt16WithValue:", $source.bonusPoints)
Second parameter contains selector to our function. It’s quite tricky – noticeWithkeyword. If you are not sure about it just print it in Xcode:
1print(#selector(CoreDataTest.CustomMigration.toInt16(value:))) - Make sure one more time that you followed all steps for Lightweight migration, set latest Model version and migrated your objects. If everything is done correctly, your migration should happen during next application run.
9. Core Data vs Realm
Realm seems to be more convenient solution right now, however I think it’s worth to learn both frameworks. Below there are some advantages of RealmSwift.
- has built-in encryption
- faster than Core Data (benchmark)
- uses less space
- a little bit simpler interface
- easy migrations
- easy fetching – no need to use
NSFetchRequest - easy to use in multithreaded environment
- support for auto-updating results
- built-in observable notifications which allow to update UI
- cross-platform library
- support for cloud sync (extra paid)
- Realm Studio which you can use to browse and manage database. It updates live when you open database from simulator’s storage.
- really nice documentation and big community
I prepared a demo project which has two targets with the same functionality. One is using Core Data and another RealmSwift, so you can easily compare usage of both: Core Data vs Realm repository.